Showing posts with label headband. Show all posts

Monday, February 13, 2012

Make It Like Me Monday

Ha! Monday, and here's the tutorial for this week. (For once I made it on Monday instead of Tuesday!)

Make a two-colored headband (turban style)

Start with 2 pieces of contrasting fleece 22" long (or the circumference of your head) x 4".

Lay one down one way and the other crossing a little to the left of midpoint, perpendicular to the first, so it forms a cross. Then fold the first one over the second one.

Next fold the second strip over the first strip...
...and twist so that they connect like this:
Then stack all four ends together and pin. Sew all four layers, clip threads, and turn right side out. Here you see the seam from the inside.

And—voila! You've made another variation on my updated vintage headband!

Monday, January 30, 2012

Fix a Bad Hair Day in 5 minutes!

We all have 'em... days when our hair does everything except what it's supposed to do. Today was one of those for me, and after denial (mine—my hair just laughed at me), a period of mourning, and feeling grief for a life that included bad hair days, I decided to fix the problem.

Now, I used fleece, 'cause it's still cold here—even though I have no intentions of going outside where the cold actually is—but you can use any stretchy material. I've made some from old tee shirts, too.
I was making several at once, so my fabric is doubled.

First things first. Lay your fabric out so that the stretch goes long ways and lay your see-through 4" wide ruler on top. This is one of the things I really like about fleece; you don't have to worry about grain, just stretch.

Oops. I forgot the first first thing. Measure your head, and add 1/2" an inch. (Actually, I just kind of lay the fabric on my head and see if it stretches all the way around my head.)

So now you have a nice, even swatch of cloth 4" wide and about 22" long (your head might have more brains in it than mine does, necessitating a bigger headband). Take it to your sewing machine and sew the short ends together, using about a 1/4" seam. (It is very forgiving here, thanks to the stretch.)

Now, if your seam is larger than 1/4", trim it down to 1/4".

Cut a piece of the same fabric (or a coordinating one might look cute) to a rectangle 2" x 3". Wrap that piece of fabric around the headband, gathering the headband and hiding the seam. You can sew it together by hand here if you want; I headed back to the sewing machine. Pulling the fabric so that it holds the gathers in the headband, sew the ends together. Turn just that piece inside out, so the seam is on the inside, and you're done!

5 minutes, and you look like you stepped out of a vintage catalog!

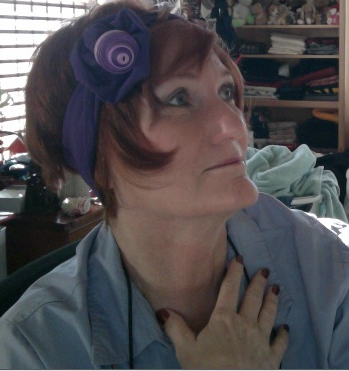
I added a flower topped by buttons in graduated sizes to give this one more character.

Monday, January 23, 2012

Make It Monday: The Stacked Button Rose Headband


Okay, I was having a bad hair day, and needed to cover at least some of it up! Loving retro like I do, I thought of the beautiful hats and headbands that ladies in the 20s and 30s wore, and decided that I could fix it.

There are lots of tutorials on making gathered fabric flowers, so I'm just going to pretend that we have one the color I need (In fact, I do!)

(OTS, do you ever get so tired at your computer that you fall asleep and keep on typing? The only way I know it's happened is because what I write makes no sense. So now mu son the critic will "give me a talking to" about writing when I'm so tired! Anyway, if something pops into the sentence that obviously shouldn't be there, please send it home with some chocolate chip cookies and a pat on the head. Or run downstairs and feed your dogs and grab the kettle cooked potato chips your hubby bought you and swear you'll only eat a few. It all helps you stay awake.)

Okay, so here's how you make the headband. You need a large or extra-large tee shirt in a color you like. Mine's purple. Measure a four inch width that encircles the whole sleeve. Here, like this:
then cut it off. You should have a tube shape with a seam on one side.Next, find your ruffled flower and set it aside. I wanted one that matched the headband, so I just made it out of a bit of the tee.

Now the coup de gras! The button rose! I simply used various shades of purple (lilac, lavender, if you prefer) in graduated sizes, and sewed them to the center of the flower. Finally, attach the whole flower to the headband so that it covers the seam and you are done. Easy-peasy.  (I like easy, 'cause I can watch episodes of my favorite tv shows on half of my screen while I do something else on the other half—like this tutorial—or hand stitch something (yes, I like to hand stitch, but then again, I also like grammar!)

I hope this "tutorial" wasn't hard to follow. If you have any questions, please ask, and I'll try to get a pdf up soon.

Until next Monday, then... have a good one!